As promised, I'm going to teach you how to add user-controls to form dynamically. If you haven't seen the previous article on adding intrinsic controls, then I suggest you read it first so you can appreciate this even better.
Although it's ideally better to apply this to ActiveX OCX, we can still do this on an ordinary standalone EXE project.
Since we'll be adding user-controls, we need to create one first. So add one from the project window (see screenshot below):

Next, let's rename this as "MyControl". You can use a different name but make you use that name when copying the codes later on.

Then we'll just make a simple design, add a Label and a Textbox to our user control.
I changed the background color to easily distinguish the control from the form that it will be added on to (but this is not required).

A. I just changed the Labels caption to "My Control". Again, you can change this to anything you like.
B. This is the textbox so we can do something to it other than making it appear on a form
To make our user control interactive, we need to broadcast some events to the consumer (the form in this lesson).
So let's add two(2) events:
Clicked() - we'll fire this event when the user clicks on the user control
KeyPressed() - we'll raise this when the user types something on the textbox
So copy the code shown below to the user control:

Next we define when these events will fire. First, let's work on the Clicked event by double-clicking on the user control (or go to UserControl object and Click property).
You should see a code similar below:

And for the KeyPressed event, we'll raise it when the textbox changes (see below):

Okay, our user control is now ready for testing. We need a consumer so we'll just use the default form in the project (see below):
In the previous post, we used an intrinsic or built-in data type called TextBox (which is specifically for a textbox control).
For user controls, VBControlExtender will be the data type to be used.
So let's define a variable of that type (with events). See below:

We don't always need it but to give you the full benefits, I'm always suggesting you create the variable as "withevents" so we can capture and handle events.
And if you've read and tried my previous post, the next codes will look familiar.

We still added the user control on the forms controls collection and given it a name (Input01) and then showed it by making it visible.
So what's the difference? Well, since VB can't possibly predict every possible user control a user can create and also the events it would contain, event handling is the main difference between intrinsic and user controls.
Remember in the previous post that we handled a specific textbox event (Change). If we created a CommandButton, there is no Change event but we could have handled the Click event.
So the more intrinsic control type you add dynamically, the more event handling you need to code.
So if that does not sound good to you, user-control could be your alternative.
And to handle user-control events we go the ControlExtenders ObjectEvent event (see below):

This event provides an Info object parameter.
It contains two(2) basic properties --- "Name" and "EventParameters".
- Name is just a string containing the controls name.
- EventParameters is a collection object having two(2) properties:
- Name - refers to the parameter name
- Value - refers to the paramete value
It's hard to picture I know, so let's see it in action.
Run the application and type something on the textbox (example, type lowercase a):
You should see a message similar below:

This is because we fired the KeyPressed event on the Text1_Change event, remember?
Now this "KeyPressed" refers to the Info.Name I was telling awhile ago.
Click on the "OK" button and another prompt will show:
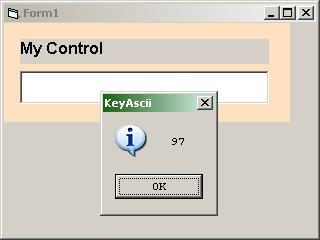
Okay, this contains two(2) information:
- The "97" is the Info.Parameters(0).Value
- The "KeyAscii" on the title/caption is the Info.Parameters(0).Name.
Now you get what I was saying, right? :)
Finally the letter "a" appeared on the control (as expected).

Remember I said something about changing the user control background?
For the next test, we'll click on the user control and see if the Clicked event will fire.
If you did not change the color of the user control, just try clicking near the textbox.
As soon as you clicked the control, a message will appear (just as expected)

This time, the Info.Name is "Clicked" (the previous one is "KeyPressed" just in case you forgot).
Since Clicked has no parameter, there is no other message that will appear (unlike in KeyPressed where KeyAscii and 97 appeared).
Okay that's it! You now have two(2) methods of adding controls at runtime on a form.
Hope you liked it and enjoyed working on it. Thanks for reading!


